Friday, December 24, 2010

MENAMBAHKAH COOKIES DI BROWSER TANPA ADD ON

cara menambahkan cookies ke browser tanpa addons. untuk mempermudah agan aja.
bisa dipake di FF & semua Mozilla browser, Google Chrome, Opera. (mungkin yang lain bisa juga, coba aja)
silakan klik disini untuk tutornya
Untuk update cookies code dimari ato disini ( yang msh anget scrool di page terakhir )

Dengan cookies ini kita bebas download spuasnya di web file sharing semisal Hotfile, Rapidshare, megaupload, depositfile, dsb karena kita akan mendapatkan akun premium GRATIS cuma dengan trik memakai cookies ini.
NB : Harap jgn di log out ya gan, ditutup aja tabnya g apa2...thanks

Tuesday, November 2, 2010

Device Doctor

Update Your Hardware Drivers For Free With Device Doctor

When you reformat your computer system, you need to reinstall your drivers but sometimes you cannot find the proper driver and then sadly you will not be able to get your hardware to function. What do you do? Well Device Doctor can also identify and download the proper driver for unidentified items.

Let’s take a look at the application, how it works and how it can help you update drivers for free.

Firstly connet internet and run the program it will do its thing:

and Click begin scan so let it scan your pc driver


Once the scan is completed you will be presented with a full list of devices that need updating. But wait! There is more - the application actually provides download links to grab the drivers that need updating. They really take all the leg work out of this for you.

If a device is unidentified the application can still grab data from the card and check for drivers online. This is super helpful when you do not know where to look for the correct drivers. This can help you to not have to open the case and pop the card out looking for the fcc id or another identifying piece of information.

When you click download update it will take you to a webpage. That page will contain information as well as the link to grab the driver.

Finally, when you don’t know what drivers you need, this can wind up being a MUST HAVE application!

Download Device Doctor

I'll post for offline guide as soon as posible...

Sunday, October 31, 2010

Tips Gagal Instal Office2007

Bagi yang error install office 2007 dan muncul tulisan :
"The windows installer service cannot update one or more protected windows files",
Pemecahannya :
1. Siapkan CD Installer Windows XP
2. Cari file bernama FP40EXT.CAB biasanya di folder \i386
3. Extrak file tersebut ke c:\program files\common files\microsoft shared\web server extensions\40\bin
4. Coba install Office 2007 nya
Atau bagi yang tidak ingin mau ribet silakan download file di akhir tulisan ini kemudian langsung ikuti langkah ke 3.

Download FP40EXT.CAB

Kalau masih gagal coba ini gan :

Change the memory settings for installation

To change the memory settings for installation, follow these steps:
  1. Click Start, and then click Run.
  2. In the Open box, type msconfig, and then click OK.
  3. On the BOOT.INI tab, click Advanced Options.
  4. In the BOOT.INI Advanced Options dialog box, select the /MAXMEM= check box, and then change the setting to 256 (or lower if your computer has less RAM).
  5. Click OK to close the BOOT.INI Advanced Options dialog box.
  6. In the System Configuration Utility dialog box, click Apply.
  7. Click OK to close the System Configuration Utility dialog box.
  8. Click Restart to the following message:
    You must restart your computer for some of the changes made by System Configuration to take effect.
  9. After you restart your computer, install Office as a Complete Install.
  10. After you install Microsoft Office, follow steps 1 through 8 to clear the /MAXMEM= check box.
Good Luck...semoga berhasil...
sumber : mikocok

Tuesday, October 26, 2010

Membuat Ghost Dari USBFD

Persiapan :

1. Flashdisk ukuran terserah (min. 64 MB)

2. Software Ghost

3. Softwre Usb Format

Mulai :

1. Buat Folder D:/ghost

2. Ekstrak File/Software Ghost yang tadi di download ke dalam Folder D:/ghost

3. Pasang Flas Disk yang akan di buat “FD Hiren”

2. Format Flas Disknya dengan menggunakan “USB Format” yang di download tadi

caranya :

  • Jalankan Program HPUSB Disk Storage (USB Format yang tadi di download)
  • Pilih Device (Flash disk anda)
  • File Sistem : FAT 32
  • Volume Label : Terserah aja (biasanya muncul sesuai nama dari flash disknya)
  • Centang Quick Format
  • Centang Create Dos
  • pilih “using DOS sistem files located at”
  • lalu browse/cari folder “ghost” (yang di buat tadi D:/ghost)
  • START

4. Setelah selesai memformat Flash Disk nya Copy semua file yang ada di folder “D:/ghost” ke dalam flash disk

bila ada keterangan muncul “Confirm file replace” Klik NO

Download Software Ghost

Download Software USB Format

Thursday, October 7, 2010

Mengubah Flashdrive Menjadi RAM


Program eBoostr ini sebenarnya tidak gratis atau dapat kitak katakan berbayar, namun sudah banyak juga cracknya atau patchnya yang bisa digunakan untuk menghilangkan batasan dalam free trial.
Konsep dasar eBoostr ini adalah membuat cache ke dalam flash drive yang tentunya kecepatan akses data untuk read/write lebih cepat dibanding dengan proses melalui hard disk.
Ada beberapa syarat yang harus dipenuhi untuk mendapatkan hasil maksimal :
1. Flash Disk dengan kecepatan Read/Write minimal 20 MB/s, lebih cepat lebih baik tidak perlu space yang terlalu besar juga minimal 512-1GB saja sudah cukup. Atau jika kesulitan menemukan flash drive yang kecepatan read/writenya bagus dapat cari flash dengan logo “ReadyBoost”.
2. Port USB 2.0
3. eBoostr program.
Cara instalasinya cukup mudah. Untuk step-by-step nya instalasi dan patch nya sebagai berikut :
1. Download dan exctrac file eBoostr.2.02.Build.424
2. Jalankan dan install eboostr.exe
3. Setelah instalasi selesai.... jangan jalankan eboostr, kalau eboostr sudah jalan secara otomatis... tutup eboostr dengan cara klik kiri eboostr yg berada di system tray (kanan bawak dekstop) lalu pilih exit
4.Setelah ditutup, jalankan patch.exe
5.Saat patch.exe di buka, pilih patch dan cari di mana program eboostr di install.
6.Setelah “done”, eboostr akan menjadi full
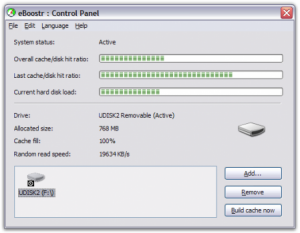
7.Untuk membuat flashdisk menjadi memory RAM tancapkan flashdisk ke komputer
8.Lalu jalankan eboostr dan pilih add
9.Pilih flashdisk yang akan di jadikan memory RAM
10.Tentukan ukuran cache, sebaiknya jangan di ubah (buat sesuai default) karena eboostr akan menentukan jumlah cache yg akan dijadikan RAM.
11.Setelah itu pilih "ok" dan tunggu beberapa saat. Proses akan berlangsung cukup lama tergantung berapa besar cache yg digunakan.
12.Setelah selesai akan ada pertanyaan, lalu pilih ok.
13.Setelah proses selesai komputer anda akan menjadi lebih cepat

Silakan Download EboosterV3.0 build491 + Jamu

Ebooster V3.o build 491 sudah support di Vista/7

Tuesday, October 5, 2010

Tips Instal Windows7 Dari Flashdisk Tanpa Tool


Menggunakan USB bootable untuk menginstal sistem operasi (OS) tidak hanya membuat instalasi lebih cepat, tetapi juga dapat menyimpan file instalasi yang sangat besar yang biasanya disimpan dalam DVD. Membuat atau menggunakan USB drive untuk menginstal sistem operasi Windows sangat mudah jika Anda mengikuti langkah-langkah yang disebutkan di bawah ini.

  1. Masukkan flash disk dengan minimal space 4GB yang masih kosong karena akan dijadikan bootable flash disk.
  2. Buka Command Prompt dengan cara klik Start dan ketik CMD dalam kotak search lalu tekan Enter. Alternativelain adalah melalui ; Start >All programs>Accessories> klik kanan pada Command Prompt dan pilih (run as administrator).
  3. Ketika Command Prompt terbuka, masukkan command/perintah berikut: DISKPART lalu klik Enter, LIST DISK lalu klik Enter. Setelah Anda masukkan perintah LIST DISK, ia akan menampilkan nomor disk USB drive Anda.
  4. Dalam langkah ini Anda harus memasukkan semua perintah di bawah ini satu per satu lalu tekan enter.
  5. SELECT DISK 1 lalu klik Enter, (nomor 1 adalah sesuai nomor flash disk Anda )
  6. CLEAN lalu klik Enter,
  7. CREATE PARTITION PRIMARY lalu klik Enter,
  8. SELECT PARTITION 1 lalu klik Enter,
  9. ACTIVE lalu klik Enter,
  10. FORMAT FS=NTFS lalu klik Enter, (mohon sabar karena proses format akan memakan waktu beberapa puluh menit baru Anda ketik perintah selanjutnya)
  11. ASSIGN lalu klik Enter,
  12. EXIT lalu klik Enter, (Jangan tutup command prompt sebelum seluruh proses selesai).
  13. Masukkan DVD Windows Anda dalam drive optik dan catat huruf drive dari drive optik dan media flash disk. Di sini saya gunakan “D” sebagai huruf kode drive DVD dan huruf “H” sebagai huruf drive flash disk.
  14. Kembali ke command prompt dan jalankan perintah berikut; D: lalu tekan [Enter], dimana “D” adalah huruf kode DVD drive.
  15. CD BOOT dan tekan Enter lalu ketikan perintah BOOTSECT.EXE/NT60 H: (dimana “H” adalah huruf kode flash disk drive) untuk membuat Fd menjadi bootable.
  16. Sekarang Salin isi DVD Windows ke USB.
  17. Booting dari USB dari PC/Netbook/Notebook anda dg menekan f2/del/f10
  18. Setelah pesan instalasi windows7 komplet jgn lupa setelah restart set booting dari HDD lg dan biarkan proses instalasi windows 7 sampai selesai.

Dengan selesainya langkah copy pada point 16 diatas maka proses pembuatan flash disk bootable selesai. Anda sekarang dapat menggunakan flash disk ini sebagai bootable USB pada setiap PC yang dilengkapi dengan fitur boot from USB (sebagian besar motherboard saat ini mendukung fitur ini).

Catatan; panduan ini hanya pada Win7 dan Vista, tidak akan bekerja pada komputer windows XP jadi caranya lain lagi.Maaf gak sempek ngasih screen shot tapi sdh penulis coba di netbook Hp 110-3014Tu spek intel atom N475 mmr 1 gb hd 160gb dan berhasil menginstal windows7 Ultimate.Semoga bermanfaat...!!!

Monday, October 4, 2010

Ghost dari HDD

Adalah tool kecil yang sangat berguna bagi teknisi komputer apabila ingin membuat image system dan merestorenya kembali bila terjadi kerusakan pada system. Namun dalam hal ini kita memakai ghost (mungkin sdh banyak yg tau) yang kita booting dari Hardisk.
Caranya mudah kok tinggal dobel klik softwarenya Ghost for HDD trus ada popoup windows untuk mereplace file boot.ini klik yes aja...selesai restart PC maka akan ada opsi pilihan windows dan norton ghost 11.5.

Semoga bermanfaat...

Download Ghost for HDD

Tuesday, July 20, 2010

Smadav 2010 Rev. 8.2 dirilis !!!

Penambahan database 100 virus baru
Virus (atau lebih tepatnya Malware) yang banyak menyebar di Indonesia saat ini kebanyakan adalah virus buatan luar negeri yang sifatnya masih mirip dengan virus lokal. Virus-virus inilah yang menjadi target-target Smadav versi terbaru ini. Virus lokal sendiri saat ini sudah mulai menurun penyebarannya dan sangat jarang ditemukan. Ini kami simpulkan dari sampel-sampel virus yang di-upload oleh Smadaver di www.smadav.net.

Smadav Virus Scanner Engine (SmadEngine.dll)
Engine lama Smadav yang telah digunakan sejak 2006 tidak digunakan lagi sejak Smadav 2010 Rev. 8.1 ini. Perombakan ulang Virus Scanner Engine inilah yang membuat rilis Smadav tertunda sebulan lebih. Engine terbaru ini benar-benar ditulis ulang dari nol menggunakan bahasa pemrograman C++ dengan menyempurnakan engine sebelumnya yang masih ditulis dengan Visual Basic. Sebagian besar teknik pendeteksian virus yang ada di engine baru ini telah dirubah dan disempurnakan menjadi lebih baik. Penggunaan memori di engine baru lebih stabil dan efisien dibandingkan engine lama, begitu pula kecepatan scanning yang juga menjadi lebih cepat.

Kompatibel di Windows Vista & 7
Pada Rev. 8 dan rev-rev sebelumnya Smadav memang masih belum kompatibel 100% di Windows Vista dan Windows 7. Tapi di Rev. 8.1 ini Smadav baik scanner maupun protector-nya sudah mendukung dan kompatibel 100% untuk digunakan di Windows Vista dan Windows 7.

Berikut ini adalah daftar lengkap penyempurnaan Smadav 2010 Rev. 8.1 :

Engine scanner baru (SmadEngine.dll) untuk mendeteksi virus lebih cepat dan akurat.
External Database (Smadav.loov) untuk memudahkan update database untuk Revisi berikutnya.
Plug-in klik kanan di explorer terbaru (SmadExtc.dll) yang lebih baik.
Kompatibel di Windows Vista & 7.
Pendeteksian beberapa Virus Internasional yang banyak menyebar di Indonesia (Sality & Alman) sudah lebih cepat dan akurat.
Penambahan database lebih dari 100 virus baru beserta varian-variannya
Perbaikan false alarm pada beberapa file.
Penyempurnaan metode blacklist key ilegal Smadav Pro
Perubahan struktur tim Smadav untuk tahun 2010
Penambahan menu uninstall di Tray Icon untuk memudahkan proses uninstall
Dan banyak penyempurnaan lainnya …

download smadav 8.2

Monday, February 1, 2010

NLite, slipstreaming SATA driver into WinXp boot cd


Materials needed:
1) nLite a free tool to help you slipstreaming(integrate) your SATA drivers into WinXp installation disk.
2) Extracted SATA drivers(if you are using Intel chipset Intel 82801GR/GH, 631xESB/632xESB, 82801GHM, ICH8R/ICH9R, 82801HEM SATA RAID Controller)

Steps:
1) Get your Windows XP installation disk and copy the contents to a new folder(I named it "WinXp").

2) Extract the SATA drivers you downloaded into a folder/drive
3) Run nLite->choose "Next".


4) Now, locate the Windows folder(for me, it's "WinXp").


5) Next again and you will come to "Presets". Ignore this by choosing "Next" again.

6) In "Task Selection", choose "Drivers" and "Bootable ISO" by high-lighting them.

7) Choose "Insert"->"Single driver"

8) Browse to the SATA driver folder(I named it "Floppy 32Bit") and select either one of the .INF file, I choose "iaahci.inf".

9) A screen like below will pop-up, make sure it's "Textmode driver" and select all of them by holding CTRL+A key and choose "OK"

10) You shall see something like this. Choose "Next" and you will be prompted.

11) Choose "Yes" to start the process.

12) Let it finish and choose "Next".

13) Finally, you can create your project as ISO image or burn it directly to CD-R under "Mode". I choose "Direct Burn". You can put anything for "Label" but not too long. Choose "Burn" and you will be prompted again.

14) Choose "Yes" to burn it to CD-R. Wait for it to finish and choose "Next"

15) Choose "Finish" to exit nLite.

Done!!!
Download NLITE

INFO(JobVacancy,Bisnis,shopping etc)

Nokia Master Code

This mastercode will not work with phones 1100, 1110, 1600, 2100, 2300, 2600, 2650, also not for BB5 phones! If you are never changed your security code, try the Nokia default code: 12345!
Wahana Ponsel FREE
Nokia Master Code
IMEI:

Believe it or Not...